Getting started
General
First of all, thank you for purchasing Vitto! Before you get started, please be sure to always search this Documentation that outline all kinds of good information and provide you with all the details you need to use Vitto. This theme can only be used with WordPress and I assume that you already have WordPress installed and ready to go. If you do not, please follow this link to see how to install WordPress.
Requirements For Vitto
To use Vitto:
- Check to ensure that your web host has the minimum requirements to run WordPress.
- Always make sure they are running the latest version of WordPress.
- You can download the latest release of WordPress from official WordPress website.
- Always create secure passwords FTP and Database.
Recommended PHP Configuration Limits
Many issues you may run into such as: white screen, demo content fails when importing, empty page content and other similar issues are all related to low PHP configuration limits. The solution is to increase the PHP limits. You can do this on your own, or contact contact your web host and ask them to increase those limits to a minimum as follows:
- max_execution_time 180
- memory_limit 128M
- post_max_size 32M
- upload_max_filesize 32M
What you have purchased
The file you have downloaded contains several folders:
- Documentation (that contains this very page)
- Dummy Data, that contains several folders (Demo Image, Demo Slider and Demo Video) each of which has:
- content.xml, the demo content taken from here
- widgets.txt that contains the info to import widgets as well, by using this plugin
- theme-options.json, that contains the demo theme options settings.
- Languages that contains:
- vitto.pot , the file you need to translate the theme in your language using Poedit
- Licensing, folder containing the licensing text files.
- WordPress Theme that contains:
- a folder called "vitto" you can upload via FTP
- and a ZIP file called "vitto.zip" you can upload from the WordPress backend
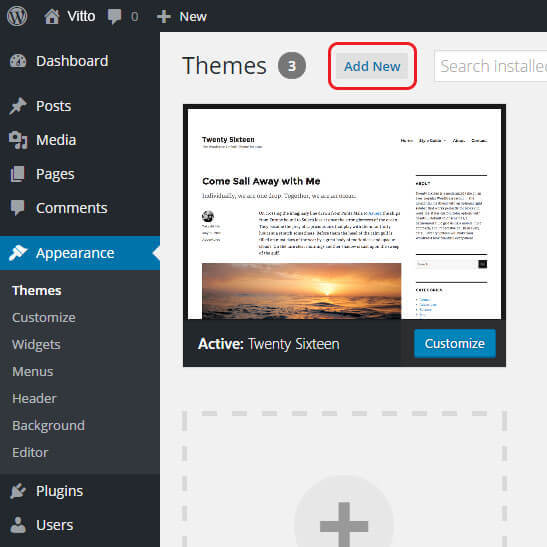
How to install the theme
You have two options to install the theme (read above where the files are located):
- by using an FTP client (FileZilla, Dreamweaver, FireFTP or similar) upload the folder called "vitto" to
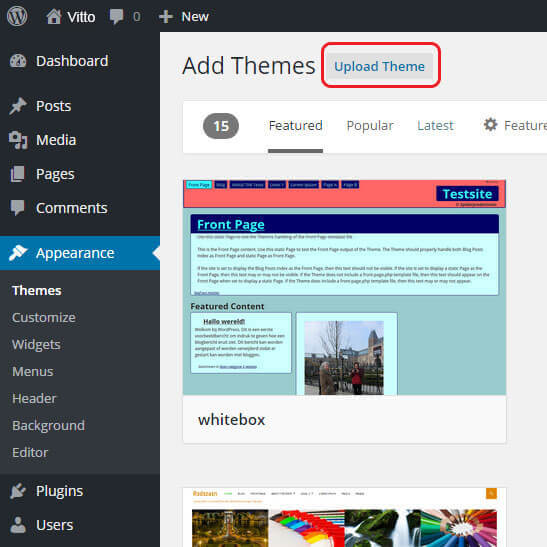
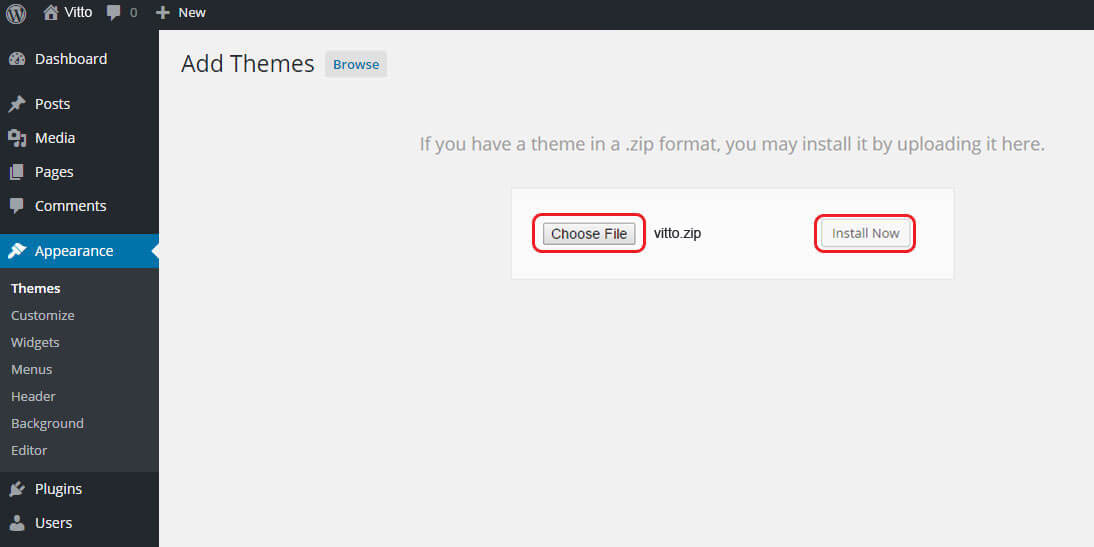
your_root / wp-content / themes - directly from the WordPress backend, go to "Appearance" → "Themes" → "Add new (theme)" and click the "Upload Theme" button on the next page. With the browse button find the aforementioned "vitto.zip" file, then click "Install Now".
After you have installed the theme, you might see the following warning:
"Redux Framework has an embedded demo . Click here to activate the sample config file."
To properly configure the theme, please ignore the warning by clicking on the "X" to its side.

How to install plugins
Above the theme options panel you should see this message box:

That's the list of the required and recommended plugins. The required plugins provide a large part of the features of this theme.
The recommended plugins are not mandatory, you won't read warning messages or get blank pages without installing them, but they are necessary if you want to update the theme and import the demo content correctly. Otherwise you'll get some "failure" notices during the import process and your installation won't reflect the demo, just this.
Simply click the "Begin installing plugins" button then the "Install" button on each plugin to start installing them. After you’ve installed them, an "Activate" button will appear which you can click to start activating them.
If you want both to use WooCommerce plugin and to import the demo content you see here, then please delete the WooCommerce pages (Cart, Checkout, My Account and Shop) generated after the WooCommerce plugin initial setup. Otherwise, if you don't want to replicate the demo, leave the WooCommerce Pages generated after the plugin initial setup.
Theme initial setup
Update your permalink structure
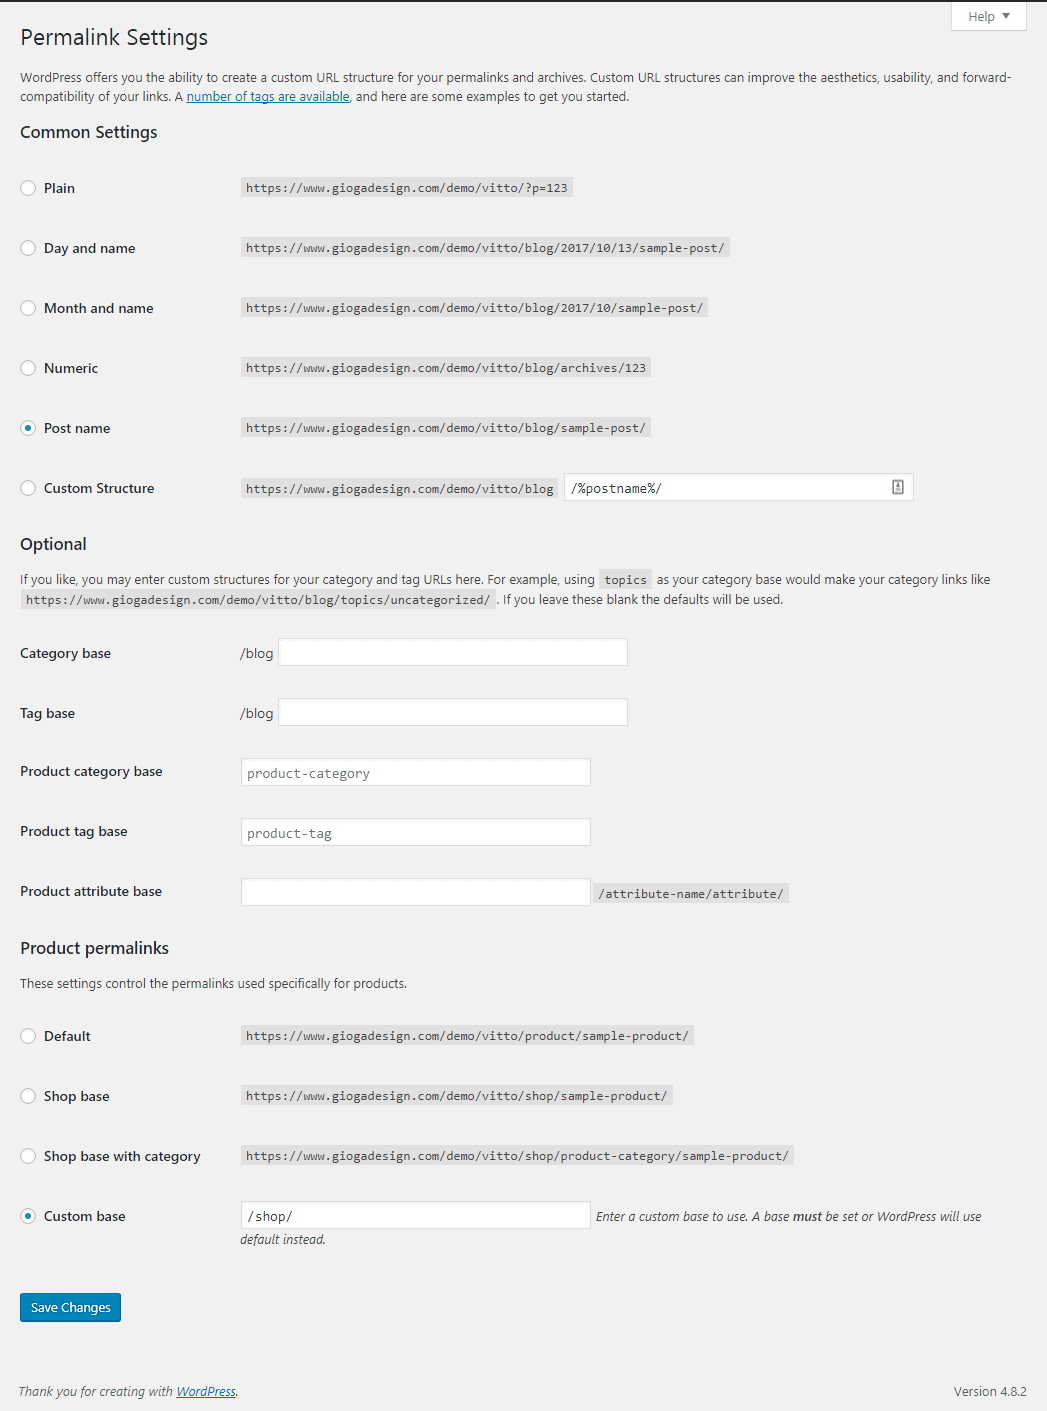
Directly from the WordPress backend, go to "Settings" → "Permalinks" and change the Common Settings from "Default" to "Post name". Then click the button "Save Changes".
If you get a single posts page "404 Not found" error, try activating the "Twenty Seventeen" default WordPress theme then going to Settings → Permalinks and simply clicking on "Save Changes" button.
Then try reactivating the "Vitto" theme and clicking again on "Save Changes" button into Settings → Permalinks.
This will update your permalinks settings and flush rewrite rules.
Setting up the Menu
Vitto supports custom WordPress menus, with one level of dropdown. There is one area of the theme where you can assign a menu:
Once a menu is created and assigned to the location, it will show up on the site. There are also several options to customize the menu. Please see below for how to create a new menu and the available menu styles.
- Navigate to "Appearance" → "Menus" section of your admin sidebar.
- Enter the menu name then click the "Create Menu" button.
- To add a menu item, select one of your created pages on the left hand side and click the "Add to Menu" button. You can also add all kinds of different links and categories from the left side.
- To add a custom menu item, enter a custom name and link into the Links box.
- Manage your menus by using the drag and drop functionality. To create a dropdown menu, simply drag a menu item below and slightly to the right of another menu item, and it will lock into place and create a dropdown section.
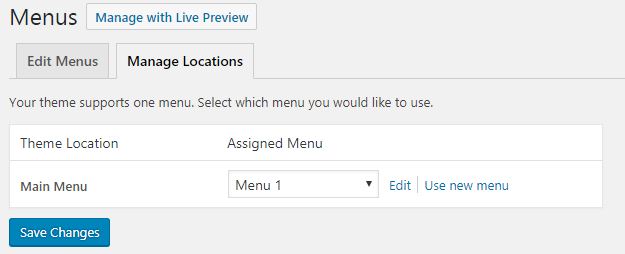
- After setting up your menu, scroll down to the bottom of the page to assign the menu to the "Main Menu" location in the Theme Locations box.
- Once its all done, make sure you click the "Save" button.
Choose the Template
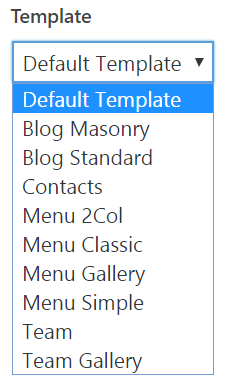
Vitto includes several page templates to choose from. For example, if you want a page to display your restaurant menu, then you would select the "Menu Classic" page template or the "Menu Gallery". All of this is done in the Pages section of your WordPress admin.
- Default Template – This is the template for all normal pages.
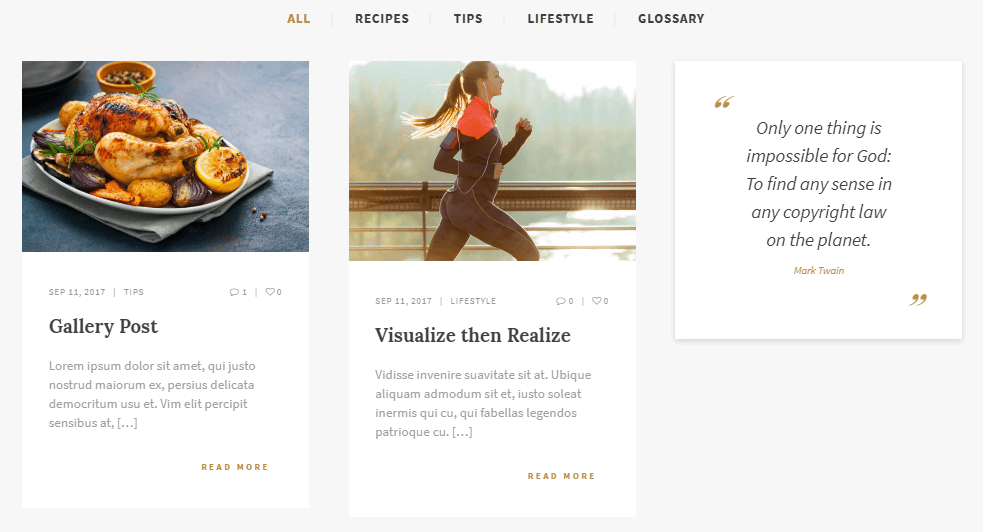
- Blog Masonry – This is the Blog page template with masonry style.
- Blog Standard – This is the Blog page template with standard style.
- Contacts – This is the Contacts page template.
- Menu 2Col – This is the Menu page template with 2 columns.
- Menu Classic – This is the Menu page template with top meals images.
- Menu Gallery – This is the Menu page template with all dishes images.
- Menu Simple – This is the Menu page template without top or lateral meals images.
- Team – This is the Team page template with cards style.
- Team Gallery – This is the Team page template with gallery style.
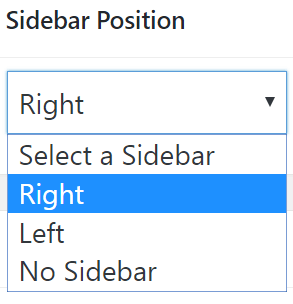
For every page you can decide to display a sidebar or not and its position. To do it simply select the sidebar into the sidebar dropdown menu into the Page section of your WordPress admin.
Theme Customization
Vitto Theme Options overview
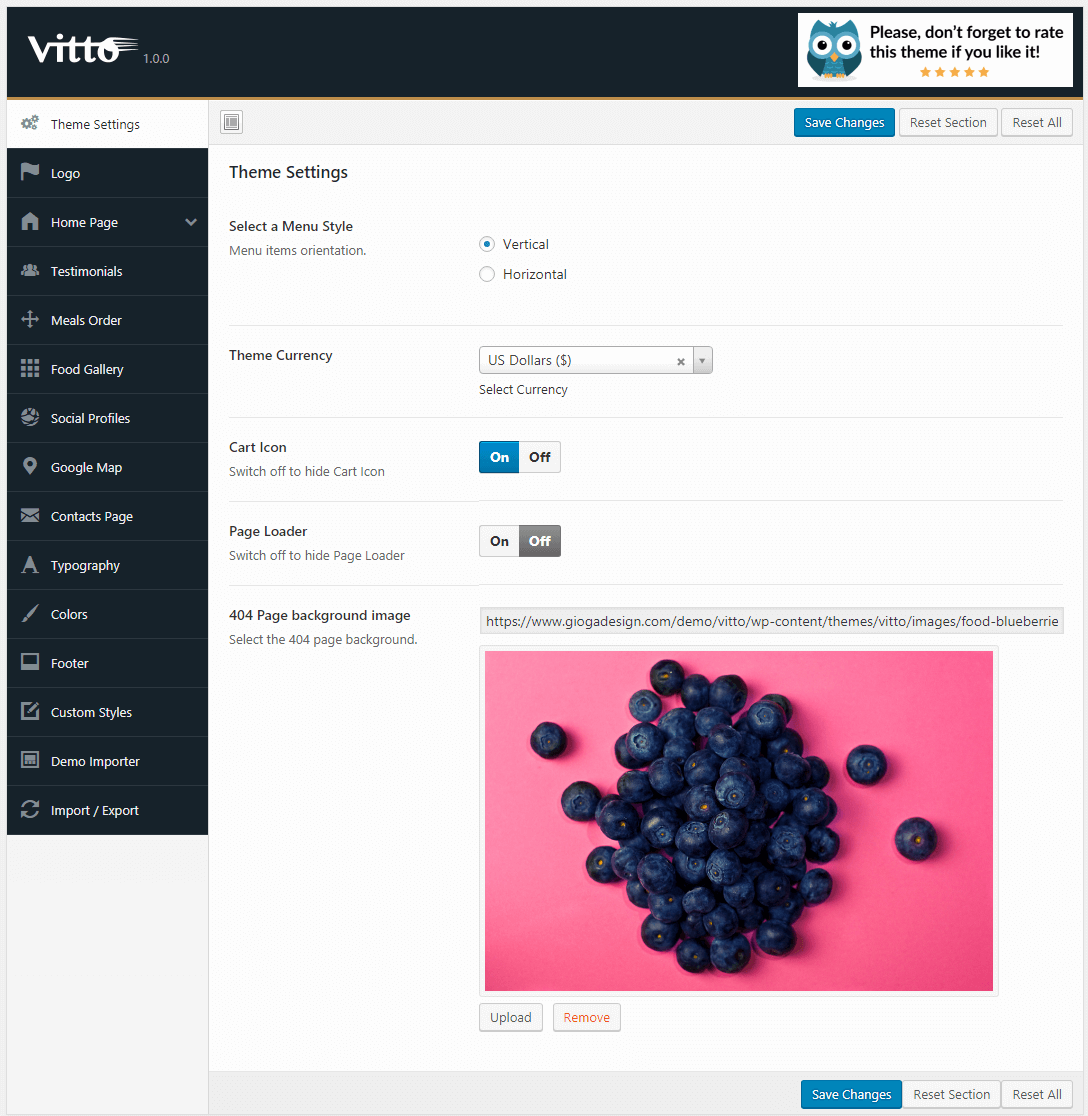
With Vitto Theme Options Panel you can choose from tons of options (Colors, Google-Fonts, Social Profiles etc.) to define the look of your site and preview changes in real time.
To begin your site customization:
- from the WordPress backendgo to Theme Options
- in the Theme Options panel choose the tab option you want to edit and, when you're done making changes, click on the "Save Changes" button at top.
- You can choose between the following options:
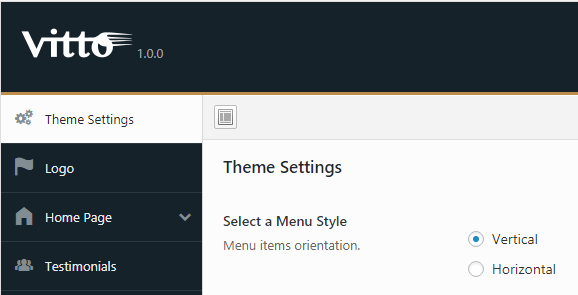
- Theme Settings, where you can choose Menu Styles, Currency, Page Loader, Cart Icon and 404 page background image.
- Logo, where you can upload your logo.
- Home Page, where you can define the position and the content of home page sections.
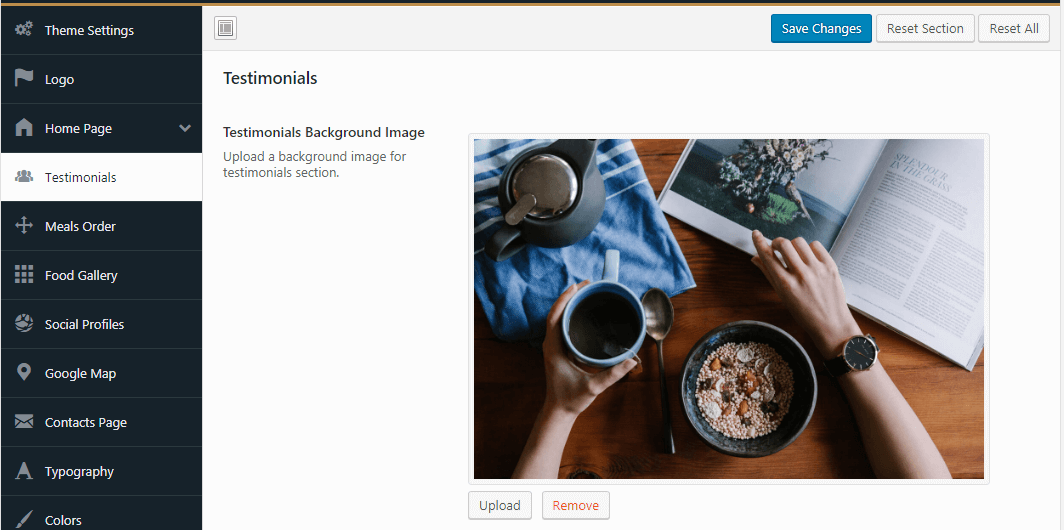
- Testimonials, where you can choose the background image of the "[gg_press]" shortcode.
- Meals Order, where you can define and reorder the meals which appear in the menu pages template.
- Food Gallery, where you can upload the images of your dishes and display them using "[gg_food_gallery]" shortcode.
- Social Profiles, where you can insert your social media links.
- Google Map, where you can insert the addresses and choose the style of the Google Map into home and contact page.
- Contacts Page, where you can change the details such contact-form, email, phone and opening hours.
- Typography, where you can choose the perfect Google Font for your site.
- Colors, where you can decide your site colors from top menu to footer.
- Footer, where you can change the footer text.
- Custom Styles, to make changes to the main stylesheet of your theme (the custom rules you set here will not be overwritten when you next update the theme).
- Demo Importer, where you can choose the demo content you want to import.
- Import / Export, where you can import the demo options or export your site options.
If you make changes to the theme’s files (i.e. anything within the “/themes/vitto/” directory), those changes are likely to be overwritten when you next update the theme.
A child theme allows you to set up a standalone directory in which you can make create copies of the theme’s files and tweak away, without fear of your work being overwritten by any future updates.
If you don’t know how to create a child theme, please follow this link.
Upload your logo
From the "Logo" section of Vitto Theme Options panel you can upload a custom logo that will be visible on your main navigation.
If you do not upload a logo, the default Vitto logo will be displayed instead.
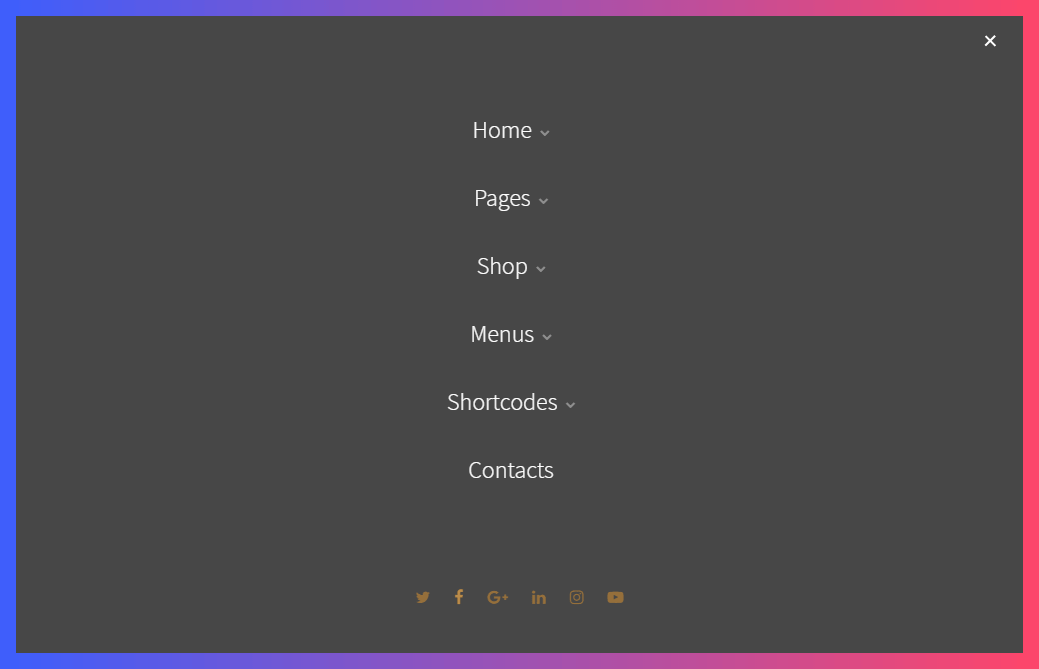
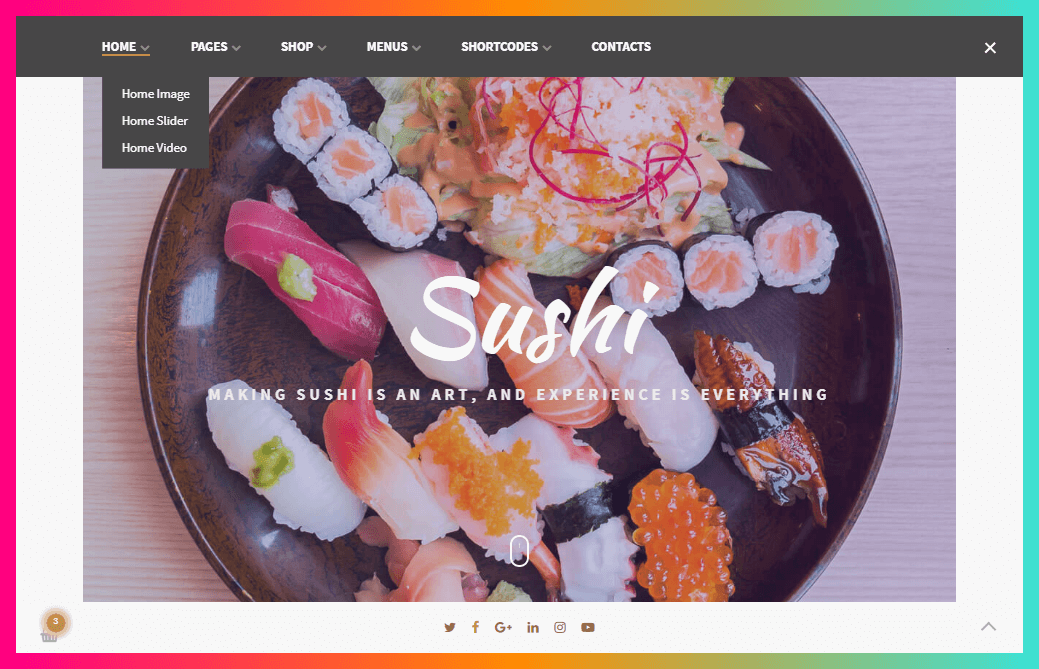
Choose menu styles
With Vitto you can choose between 2 different menu styles: a horizontal menu and a vertical overlay menu. After you have set up the menu, as explained above, from the WordPress backend, you need to go to "Theme Options" → "Theme Settings" and select a menu style for the Top Menu, by default the theme uses the vertical overlay style.
- Vertical overlay menu, which supports 1 level of dropdown.
- Horizontal menu, which supports 1 level of dropdown.
Change colors
From the "Colors" section of Vitto "Theme Options" you can choose between many options for your website.
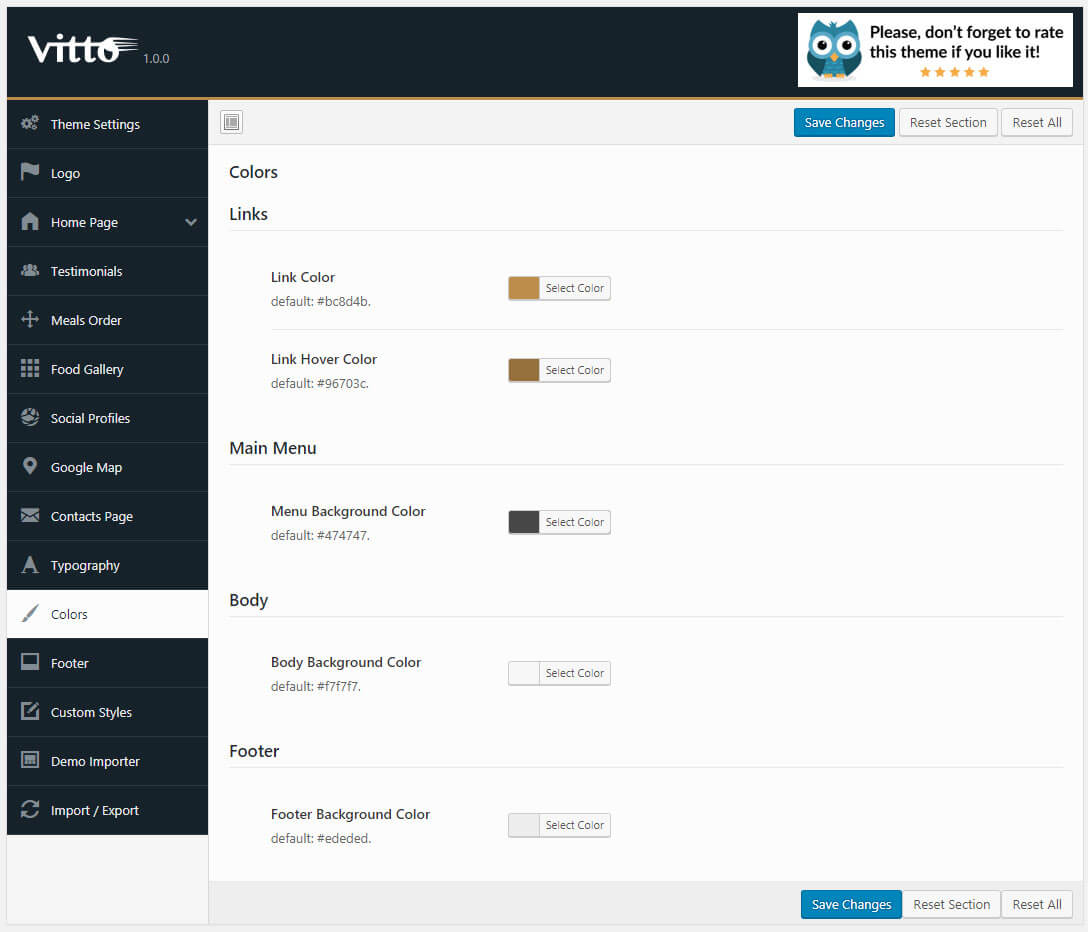
Change Links Color
To change links color, go to the "Colors" section of Vitto Theme Options and select your desired color palette, then click the "Save Changes" button.
Change Other Colors
To change Menu / Body / Footer Colors, as for links color, go to the "Colors" section of Vitto Theme Options and select your desired color through the pickers.
Change header image
To change the Header Image of your pages, simply upload or select your desired "Featured Image" for that page into the "Edit Page" section.
Change font
To edit the Fonts of your site, go to the "Typography" tab of Vitto Theme Options, check the boxes and begin typing the font family you want to use.
Change footer text
To change the text displayed in footer, go to the "Footer" tab of Vitto Theme Options, and type your custom text into the "Footer Text" section.
Widgets and Sidebars
All widgets are accessed in the "Widgets" section of the WordPress admin. Widgets can be added to any sidebar.
There are various fields and settings to choose for each individual widget; all are self explanatory.
You can put as many widgets as you want inside of a sidebar.
This theme supports 3 widgets areas: main sidebar, shop sidebar and footer sidebar. Check out the demo to see how they are used.
Add contents
Add the Homepage
After you've created an homepage, from the WordPress Dashboard, go to "Settings" → "Reading" and select the "A Static Page" option which is under the heading "Front Page Displays". Then Select the page that you created from the "Front Page" drop down . eg: Home.
Select the "Your latest posts" option if you want to use the theme default homepage sections displayed into the demos.
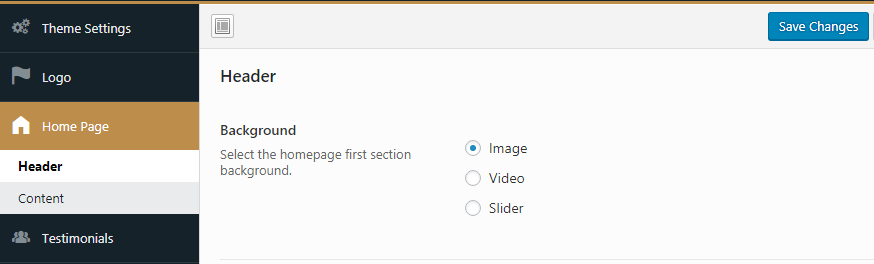
To change the homepage header go to "Theme Options" → "Home Page" → "Header" and select the homepage first section background (Image/Video/Slider). Then add your custom images or video into the fields below and press the "Save Changes" button.
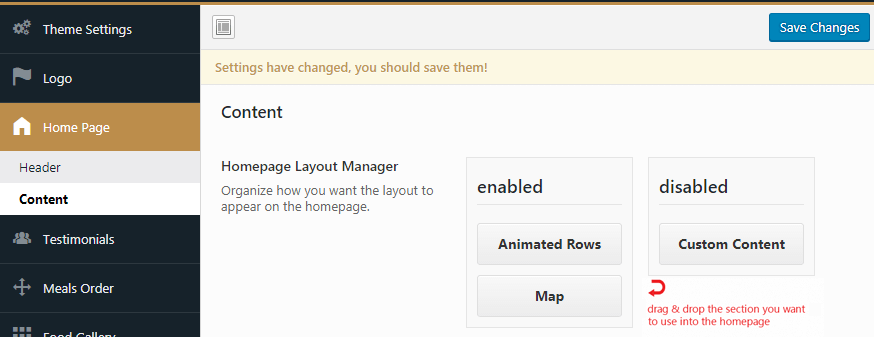
To change the homepage content go to "Theme Options" → "Home Page" → "Content" and drag & drop the sections you want to display, then customize their content in the fields below.
When you're done making changes, press the "Save Changes" button.
Add new Dish
Directly from the WordPress backend, go to "Dishes" → "Add New", fill in the fields (ingredients, description, price, "meals" taxonomy and featured image) then click the "Publish" button.
These dishes will appear in Menu templates pages (Menu 2Col, Menu Classic, Menu Gallery, Menu Simple) and in the [gg_menu] shortcode.
Add new Recipe
Directly from the WordPress backend, go to "Recipes" → "Add New", fill in the fields then click the "Publish" button.
These dishes will appear in Blog templates pages and will be filtered by "Dish Type" taxonomy.
Add new Testimonial
Directly from the WordPress backend, go to "Testimonials" → "Add New", fill in the fields then click the "Publish" button.
The testimonials you add here will be visible only if you use the "[gg_press]" shortcode.
To change the Press background image go to "Theme Options" → "Testimonials", upload your custom image then click the "Save Changes" button.
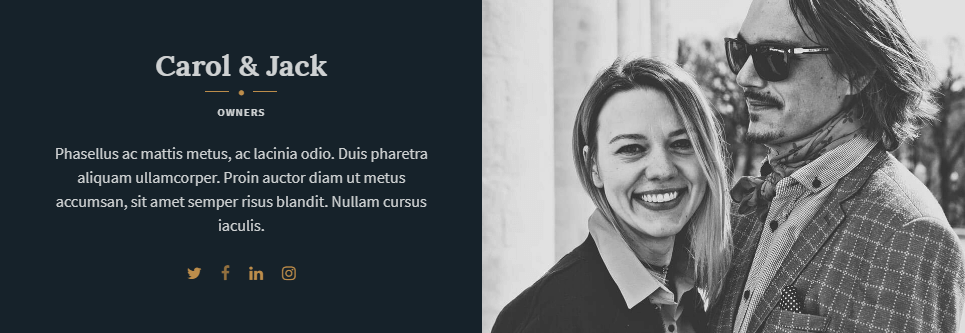
Add new Team Member
Directly from the WordPress backend, go to "Team" → "Add New", fill in the fields then click the "Publish" button.
The team members you add here will be visible into the Team or Team Gallery page template and if use one of the team shortcodes:
[gg_team]
[gg_team style="gallery"]
Shortcodes Overview
Menu
[gg_menu]
Output

Latest Posts
[gg_posts]
Display the latest 3 posts.
Output
Team Members
[gg_team]
[gg_team style="gallery"]
Output

Gallery
[gallery size="large" link="none" ids="106,107,67,60"]
Possible attributes:
size = "thumbnail/medium/large/full";
link = "file/none";
ids = images ids.
Output
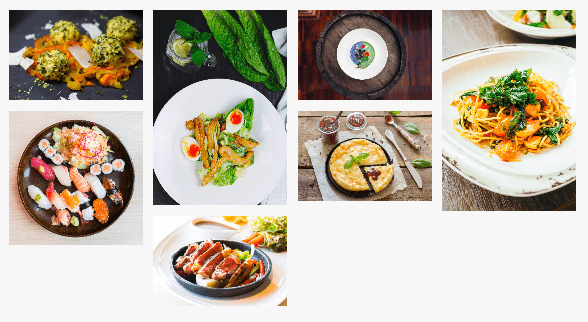
Food Gallery
[gg_food_gallery]
Display all the images you inserted into "Theme Options" → "Food Gallery" section.
[gg_food_gallery ids="106,107,67,60"]
Use the ids attribute to display only the images you want.
Output
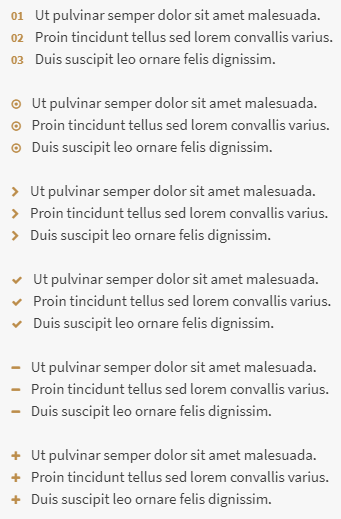
List Types
<ol>
	<li>Ut pulvinar semper dolor sit amet malesuada.</li>
	<li>Proin tincidunt tellus sed lorem convallis varius.</li>
	<li>Duis suscipit leo ornare felis dignissim.</li>
</ol>
[gg_list type="list-1"]
	[gg_li]Ut pulvinar semper dolor sit amet malesuada.[/gg_li]
	[gg_li]Proin tincidunt tellus sed lorem convallis varius.[/gg_li]
	[gg_li]Duis suscipit leo ornare felis dignissim.[/gg_li]
[/gg_list]
[gg_list type="list-2"]
	[gg_li]Ut pulvinar semper dolor sit amet malesuada.[/gg_li]
	[gg_li]Proin tincidunt tellus sed lorem convallis varius.[/gg_li]
	[gg_li]Duis suscipit leo ornare felis dignissim.[/gg_li]
[/gg_list]
[gg_list type="list-3"]
	[gg_li]Ut pulvinar semper dolor sit amet malesuada.[/gg_li]
	[gg_li]Proin tincidunt tellus sed lorem convallis varius.[/gg_li]
	[gg_li]Duis suscipit leo ornare felis dignissim.[/gg_li]
[/gg_list]
[gg_list type="list-4"]
	[gg_li]Ut pulvinar semper dolor sit amet malesuada.[/gg_li]
	[gg_li]Proin tincidunt tellus sed lorem convallis varius.[/gg_li]
	[gg_li]Duis suscipit leo ornare felis dignissim.[/gg_li]
[/gg_list]
[gg_list type="list-5"]
	[gg_li]Ut pulvinar semper dolor sit amet malesuada.[/gg_li]
	[gg_li]Proin tincidunt tellus sed lorem convallis varius.[/gg_li]
	[gg_li]Duis suscipit leo ornare felis dignissim.[/gg_li]
[/gg_list]
Output
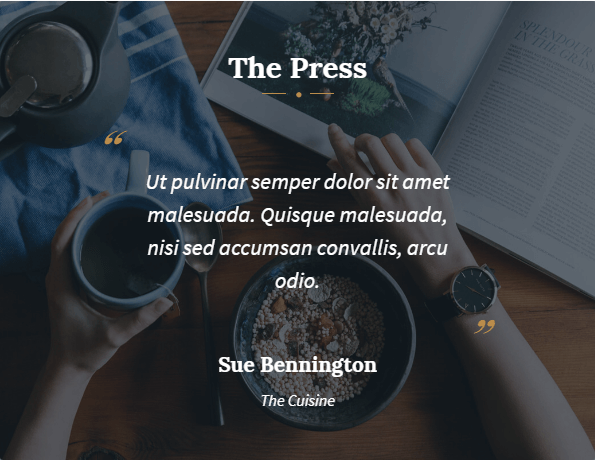
Press
[gg_press]
It displays the testimonials opinions.
To change the Press background image go to "Theme Options" → "Testimonials", upload your custom image then click the "Save Changes" button.
Output
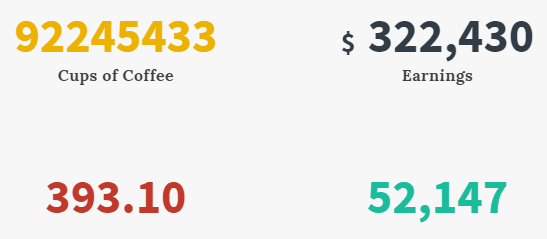
Counters
[gg_counter title="Earnings" symbol="$" color="#323c46"]322,430[/gg_counter]
Possible attributes:
title = text under numbers;
symbol = symbol before numbers;
color = numbers color
Output
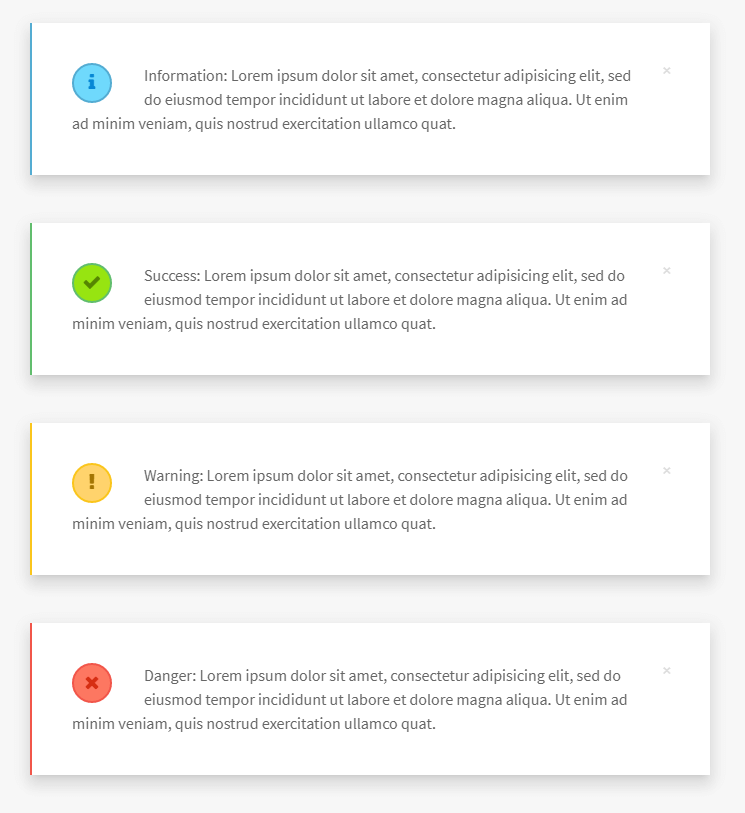
Messages
[gg_message color="alert-info"]Information: Lorem ipsum dolor sit amet, consectetur adipisicing elit, sed do eiusmod tempor incididunt ut labore et dolore magna aliqua. Ut enim ad minim veniam, quis nostrud exercitation ullamco quat.[/gg_message]
[gg_message color="alert-success"]Success: Lorem ipsum dolor sit amet, consectetur adipisicing elit, sed do eiusmod tempor incididunt ut labore et dolore magna aliqua. Ut enim ad minim veniam, quis nostrud exercitation ullamco quat.[/gg_message]
[gg_message color="alert-warning"]Warning: Lorem ipsum dolor sit amet, consectetur adipisicing elit, sed do eiusmod tempor incididunt ut labore et dolore magna aliqua. Ut enim ad minim veniam, quis nostrud exercitation ullamco quat.[/gg_message]
[gg_message color="alert-danger"]Danger: Lorem ipsum dolor sit amet, consectetur adipisicing elit, sed do eiusmod tempor incididunt ut labore et dolore magna aliqua. Ut enim ad minim veniam, quis nostrud exercitation ullamco quat.[/gg_message]
Output
Buttons
[gg_button size="btn-small"]Small[/gg_button]
[gg_button href="https://www.google.com"]Medium[/gg_button]
[gg_button color="#b99aff" size="btn-large"]Large[/gg_button]
[gg_button_animated color="#DAA25A" size="btn-large"]Large[/gg_button_animated]
Possible sizes: btn-small, btn-large.
Insert your button url link into the href parameter:
[gg_button href="https://www.google.com"]Read More[/gg_button]
If you want the button color changes to white on hover, then add attribute reverse="reverse"
[gg_button_animated color="#DAA25A" reverse="reverse" size="btn-large"]Large[/gg_button_animated]
Output

Columns
[gg_row]
	[gg_column width="1/2" align="text-left"] Lorem ipsum dolor sit amet, consectetur adipisicing elit, sed do eiusmod tempor incididunt ut labore et dolore magna aliqua. Ut enim ad minim veniam, quis nostrud exercitation ullamco quat.[/gg_column]
	[gg_column width="1/2" align="text-right"] Lorem ipsum dolor sit amet, consectetur adipisicing elit, sed do eiusmod tempor incididunt ut labore et dolore magna aliqua. Ut enim ad minim veniam, quis nostrud exercitation ullamco quat.[/gg_column]
[/gg_row]
Possible widths: 1/1, 1/2, 1/3, 2/3, 1/4.
Possible alignments: text-left, text-right, text-center.
Output

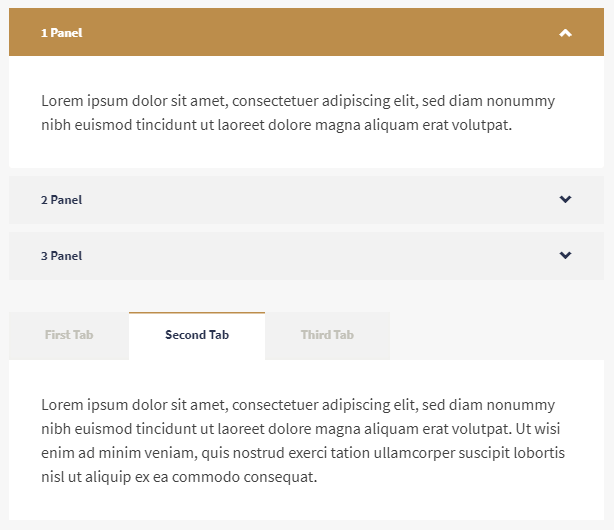
Tabs and Accordion
[gg_tabs]
	[gg_tab title="First Tab"] Lorem ipsum dolor sit amet, consectetuer adipiscing elit, sed diam nonummy nibh euismod tincidunt ut laoreet dolore magna aliquam erat volutpat.[/gg_tab]
	[gg_tab title="Second Tab" selected="true"]Lorem ipsum dolor sit amet, consectetuer adipiscing elit, sed diam nonummy nibh euismod tincidunt ut laoreet dolore magna aliquam erat volutpat. Ut wisi enim ad minim veniam, quis nostrud exerci tation ullamcorper suscipit lobortis nisl ut aliquip ex ea commodo consequat.[/gg_tab]
	[gg_tab title="Third Tab"] Lorem ipsum dolor sit amet, consectetuer adipiscing elit, sed diam nonummy nibh euismod tincidunt ut laoreet dolore magna. [/gg_tab]
[/gg_tabs]
[gg_accordion]
	[gg_panel title="1 Panel"] Lorem ipsum dolor sit amet, consectetuer adipiscing elit, sed diam nonummy nibh euismod tincidunt ut laoreet dolore magna aliquam erat volutpat.[/gg_panel]
	[gg_panel title="2 Panel"]Lorem ipsum dolor sit amet, consectetuer adipiscing elit, sed diam nonummy nibh euismod tincidunt ut laoreet dolore magna aliquam erat volutpat. Ut wisi enim ad minim veniam, quis nostrud exerci tation ullamcorper suscipit lobortis nisl ut aliquip ex ea commodo consequat.[/gg_panel]
	[gg_panel title="3 Panel"] Lorem ipsum dolor sit amet, consectetuer adipiscing elit, sed diam nonummy nibh euismod tincidunt ut laoreet dolore magna. [/gg_panel]
[/gg_accordion]
Possible attributes: title, selected (true/false).
Output
Headers
[gg_header]Not Fast Food... It's Fresh Food Fast![/gg_header]
Output

Sections
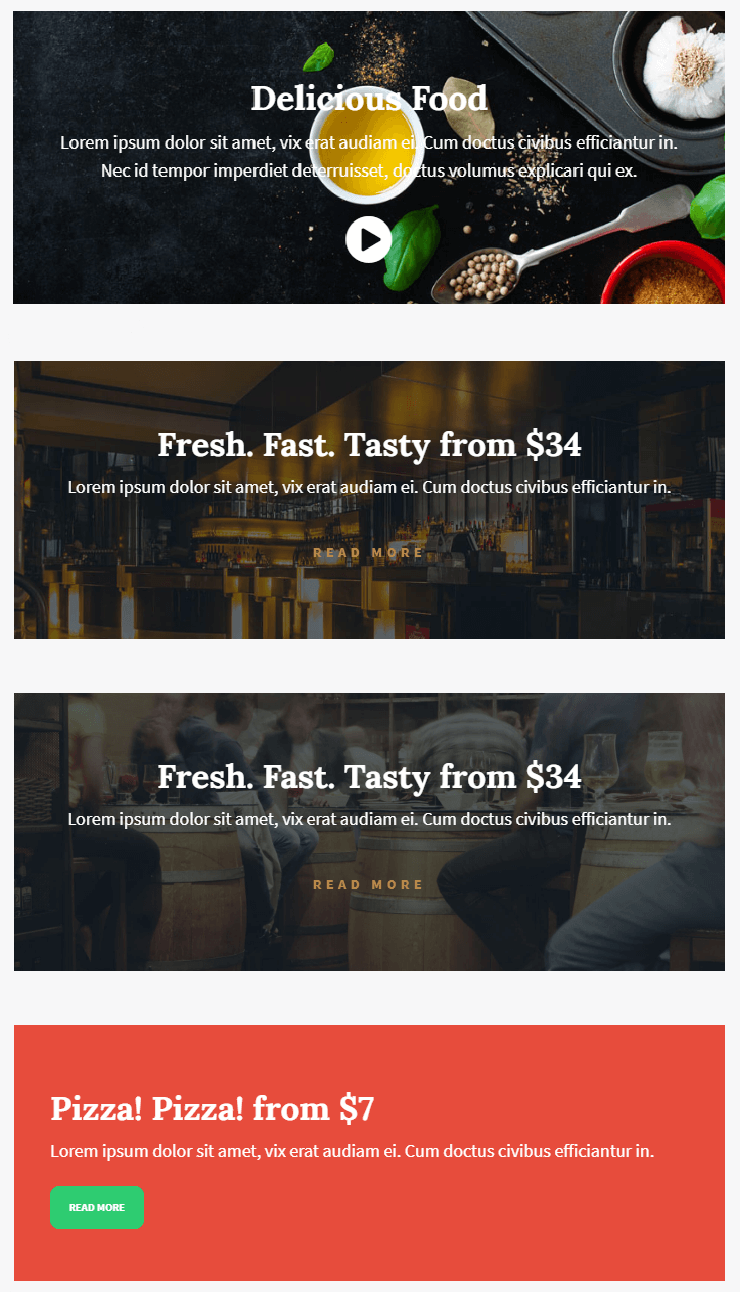
[gg_video_section image="your-image-url" video="your-video-url"]
Your content here.
[/gg_video_section]
[gg_section text_color="#fff" background_color="#00BCD4" image="your-image-url"]
Your content here.
[/gg_section]
[gg_section text_color="#fff" parallax="no" image="your-image-url"]
Your content here.
[/gg_section]
[gg_section text_color="#fff" parallax="no" background_color="#e74c3c"]
Your content here.
[/gg_section]
Possible parameters: video(your video url, only for gg_video_section), image (your image url), background_color (the background color for your section), text_color (the color for the text of your section), fullwidth (yes/no), parallax (yes/no).
Output
Import Demo Contents
When you first install Vitto theme, it will not contain all the extra content that you might have seen in the live demo. To import the Vitto demo content you can choose one of the two different procedures: auto import demo contents or manual import demo contents.
Auto import demo contents
From the WordPress backend, go to "Theme Options" → "Demo Importer" and press "Import Demo" button, as pointed in screen shot below. Now wait, It can take few minutes as images are fetched from remote server. Once done click the "Save Changes" button. Now you can visit your site.

Manual import demo contents
To manual import the Vitto demo contents you need to follow these steps (remember that you do not need to follow this section if you have already imported demo contents using auto import demo contents feature explained above):
- from the WordPress backend go to "Pages" → "All Pages" and delete all the default pages;
- delete all the default widgets inside the sidebars;
- install and activate the WordPress Importer plugin;
- upload the file contents.xml contained in the folder called "Dummy Data". To do that, in the WordPress backend, go to "Tools" → "Import";
- choose "WordPress" from the importer system list;
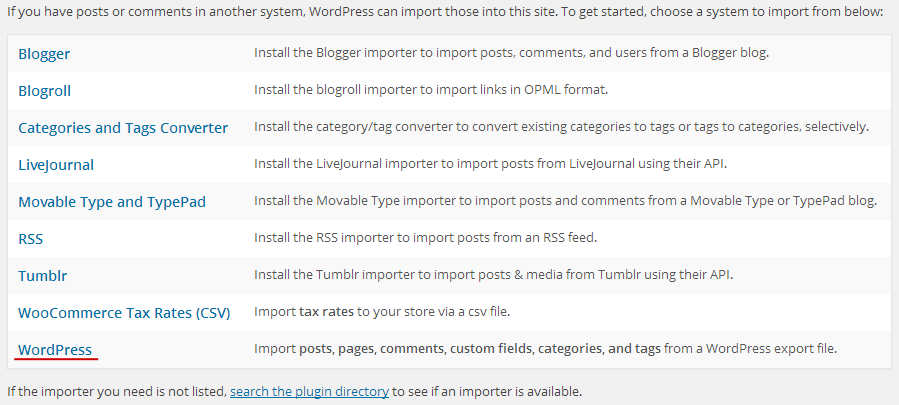
- select the file you want to import (contents.xml);
- click the "Upload file and import " button;
- import or assign author;
- if you want to import the file attachments you see in the demo, check the "Download and import file attachments" box then click the "Submit" button.

To import the demo widgets, install and activate the Widget Importer & Exporter plugin, from the WordPress backend, go to "Tools" → "Widget Importer & Exporter" and into the "Import Widgets" section upload the file called widgets.txt.
To import the demo theme settings, make sure to have installed and activated the "Redux Framework" plugin:
- from the WordPress backend, go to "Theme Options";
- click the "Import / Export" tab;
- click "Import from File" button;
- type the content of the theme-options.json file into the textarea;
- click the "Import" button;
- click the "Save Changes" button;
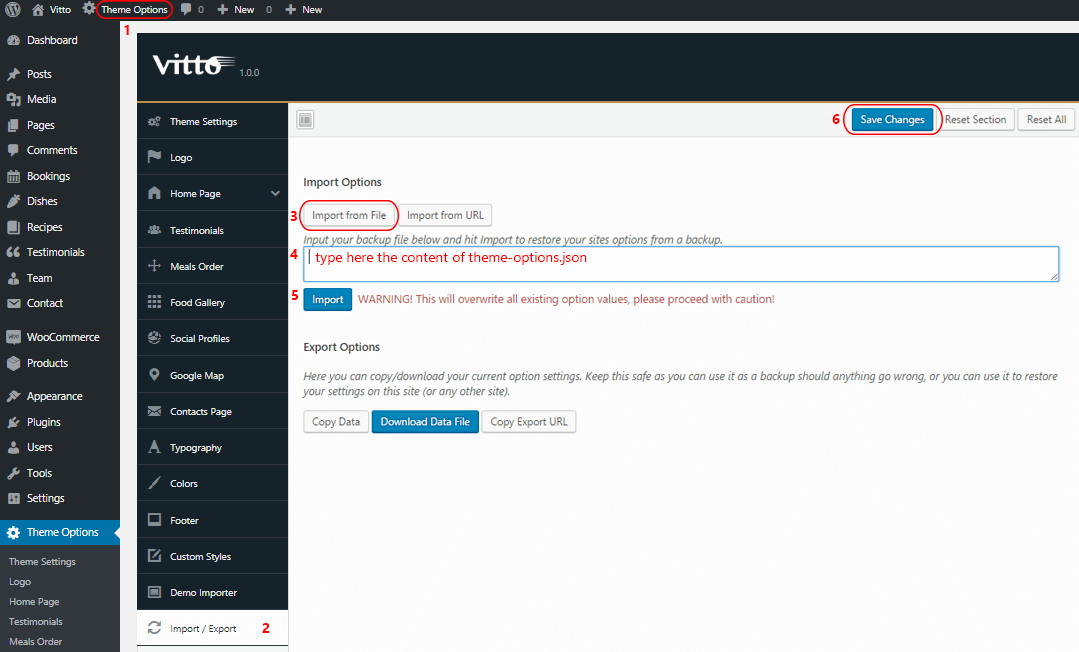
After this procedure, your site should look like the demo.
Update theme and plugins
You can update the theme by activating a different theme for a while, deleting Vitto from the theme list and upload it again via the WordPress backend.
As an alternative you can upload a new version via FTP and override all the old files.
Using the Envato Market Plugin
- Download the Envato Market Plugin.
- Upload the plugin .zip via the Plugins > Add New section of the WordPress admin dashboard.
- Click Install Now and then Activate Plugin.
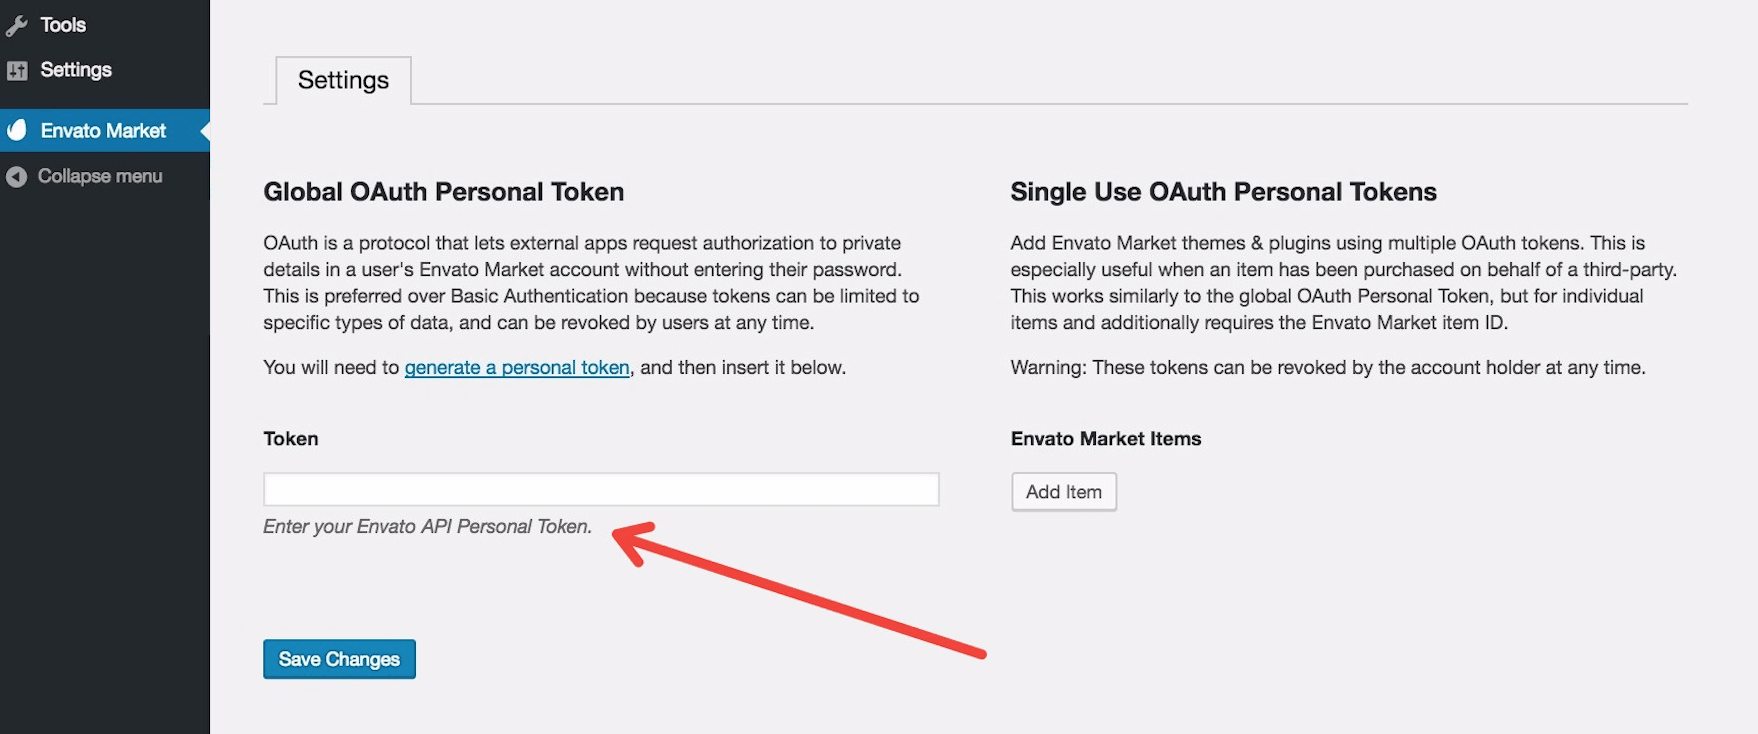
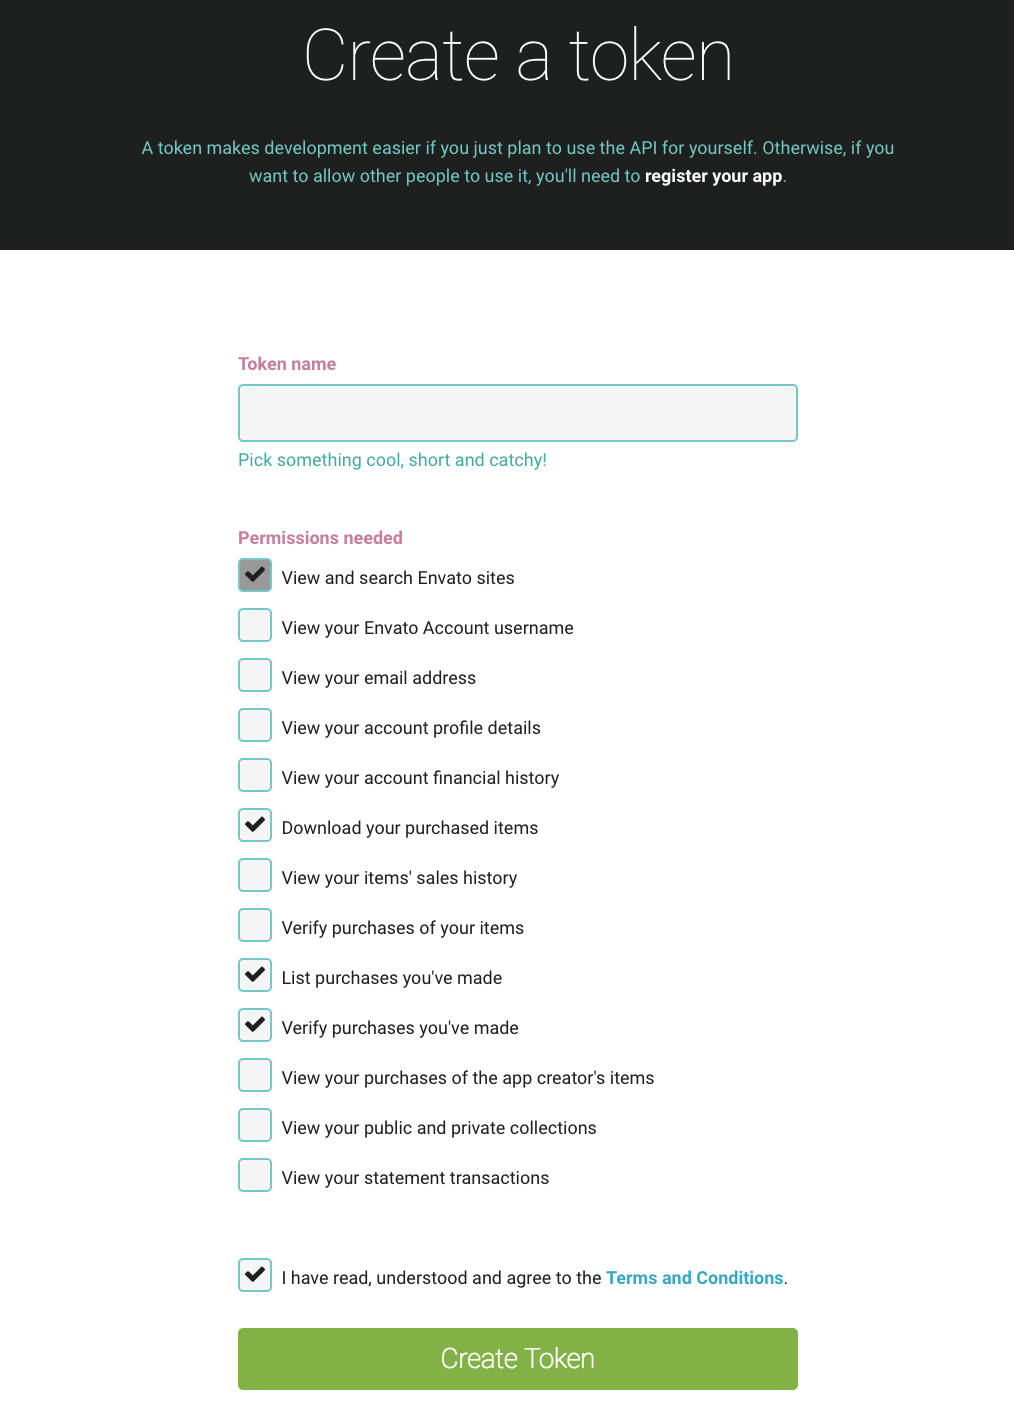
- Now head to the Envato Market plugin page and click on the Generate a personal token link.
- Next give your token a name and check the box that you have read and agree to the terms. Click the Create Token button to generate your token.
- Copy your token that’s been generated and head back to your WordPress setup in the plugin page to paste it in the token field. This should allow Vitto to show up as one of your themes within the plugin – from here on you gain the benefit of quicker updates & update notifcations.